Getting started with ESXi

In this longer post, we’ll get started with ESXi, how to install it and login. ESXi is meant to run as the OS, and to be very minimal so there’s as much resources as possible available for the guest OS’s. Even the install is very spartan! Lucky for us, however, it is fairly straight forward to install.

Install esxi for sql

Once you boot from the ISO, you’ll be greeted with the welcome screen. Not much to note here.

Esxi sql license

Agree to the EULA and move ahead…

VirtualBox_ESXi_21_11_2018_21_23_00

Select the disk to install the main OS on. Do keep in mind that this will format your disk, so any existing content will be wiped out! Additional drives can be provisioned post-install, in the management site.

VirtualBox_ESXi_21_11_2018_21_23_20

Select your preferred keyboard layout here.

VirtualBox_ESXi_22_11_2018_12_49_19

Choose your admin password.

VirtualBox_ESXi_22_11_2018_12_49_58

These are two interesting errors I got, but you’re not likely to see them. I was installing ESXi in a VirtualBox VM (so I could capture the screenshots), and I forgot to provision the proper amount of CPUs. So here, ESXi is telling me that it needs at least 2 CPU cores, or no install! It was a simple fix (just go back to the VM options and add more CPUs); but VMWare doesn’t expose hardware virtualization, so I got the second error regardless. You can still setup ESXi without hardware virtualization, however, as seen below.

VirtualBox_ESXi_22_11_2018_12_57_32

Ok, this is it! Final confirmation

VirtualBox_ESXi_22_11_2018_12_57_42

And now you’re done. Congrats!

VirtualBox_ESXi_22_11_2018_12_58_31

The next time you reboot your box, this is what you’ll see:

VirtualBox_ESXi_22_11_2018_13_00_49

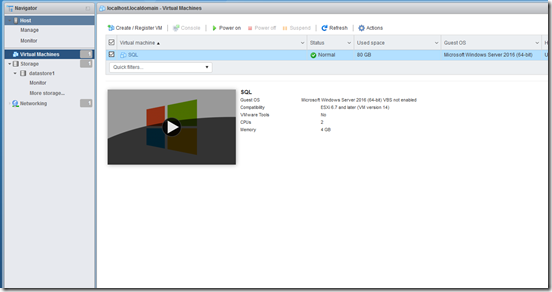
There is some very minimal configuration you’ll be able to do from the console itself. To do everything else, you’ll need to navigate to the URL displayed in this screen (your IP will likely be different from mine). Login with the admin credentials you created earlier.

UI

admin screen

In our next episode, we’ll go over the basics of this UI and how to setup guests and all that fun stuff.

Useful links!

Official Documentation

Other posts in this series

Install VirtualBox

Mini-lab overview

Getting started with VirtualBox

VirtualBox is a great virtualization tool if you plan on running VMs on your regular desktop. For this post, we’ll get started with Virtualbox by creating a new VM and booting off of an ISO.

As a preparation for a future post, I’m actually going to install ESXi within VirtualBox. ESXi is meant to run as a full OS, so you only want to install it if you have dedicated hardware for your VMs. The VM creation process is the same if you’re going to install Windows Server, Linux, etc, so no worries there.

l-21897-is-this-inception

Queue in the Inception jokes

From previous posts, you should already have VirtualBox installed. We’ll start by launching VirtualBox, and then clicking on New. You’ll be presented with this dialog

2 - guest type

From here you can select the Operating System type. It doesn’t change the functionality of the VM per se, all it does is pre-select RAM, CPU and storage to match your selection.

ram

Note that RAM is always soft-allocated: the VM will only use as much RAM as is required by the underlying guest. While that allows you to have more VMs than you have physical RAM (over-allocation), there’s nothing stopping the VMs from using up all their allocated RAM either, which will cause the Host OS to page down to disk, ending in severe performance degradation. Keep that in mind!

create disk

From this dialog, you can choose how to create your virtual disk. Generally speaking, you’ll want to select “Create a new virtual disk”. You can also add an existing virtual disk now, if you happen to have one.

vdi type
  • VDI is the native file type for VirtualBox, so that’s what I prefer to go with.
  • VMDK is an open format, also supported by VMWare, so you should be able to grab an existing VMDK from, say, VirtualPlayer, and open with VirtualBox.
  • VHD is a format supported by Microsoft. It also has the added benefit that you can mount it in windows, just like any other ISOs.
disk allocation

You’ll now have to decide how the disk file will be built. You’ll usually want to do “Dynamically allocated”, so the file will grow only as the guest needs it. If you select “Fixed size” the file will be created at the full requested size. You will select the actual size in the next screen). The bigger the file, the longer it’ll take to complete the operation.

disk size

In this dialog you’ll also be prompted for the location of the data file. This is the last dialog! You’re now the proud owner of an empty VM, the equivalent of computer with an empty hard drive. Before you can get this puppy up and running, you’ll need to attach the ISO for whatever OS you’re going to install.

attach ISO

Select your VM, get the properties window, then select Storage, select the “Empty” DVD icon, then click on the DVD icon and click “Choose Virtual Optical Disk File” (whew). You can see that I previously used a windows 95 tools ISO file. In my case, I’m going to choose the ESXi ISO, but you can select whatever ISO you have (windows server, Ubuntu, etc). Click OK, select your brand-new VM and click “Start” to power it up.

start

And there you have it! You should now be greeted by the installer screen of whatever it is you’re installing.

VirtualBox_ESXi_21_11_2018_21_22_25

For the next post in this series, we’ll walk through installing ESXi (which I hope you’re installing on real hardware!).

Useful links!

Virtualbox download page

Script: Where in the disk are my indexes?

Index maintenance is one of those things that you have to stay on top of, in order to keep your data flowing smoothly. In no particular order:

  • Index defrags/rebuilds
  • Removing unused indexes
  • Optimizing existing indexes
  • Saving index definitions (ever had someone complain an index “went missing?”)
  • Move them to a separate filegroup/disk
  • Etc…

A few months back, we were having issues with heavy I/Os, so one of our plans was to move all the indexes into a separate filegroup, located in a different disk. This way, we’d end up with separate threads: One for the update itself, and one for the index update. The snag was that, overtime, new indexes were added to the original data filegroup, so now they were all over the place.

In an attempt to figure out the lay of the land, I wrote the following query. This script will tell you the filegroup an index lives in, which will help me identify what needs to be moved where. It does not include heaps (which are not indexes) and system indexes (because you should probably leave those alone).

SELECT ds.name AS FileGroupName,
s.name AS schemaname,
o.name AS TableName,
i.name AS indexname
FROM sys.objects o
INNER JOIN sys.indexes i
ON o.object_id = i.object_id
INNER JOIN sys.data_spaces ds
ON ds.data_space_id = i.data_space_id
INNER JOIN sys.schemas s
ON o.schema_id = s.schema_id
WHERE o.is_ms_shipped = 0
AND i.index_id > 1
ORDER BY ds.name,
o.name,
i.index_id;

Once I had them identified, it was easy to write some dynamic sql to move rebuild them into a new location. The syntax is easy:

CREATE INDEX [indexname]
ON table
WITH (ONLINE = ON, DROP_EXISTING = ON)
ON [filegroupname];

You have to write out the entire index definition as it currently stands, but the Drop_existing = ON will instruct SQL to recreate the index in the specified filegroup, instead of just complaining that the index already exists. Online = ON (if you’re on Enterprise edition) will allow you to run this without dropping the index first, or additional blocking.

Mini-script – Get Session Progress

Don’t you wish to know how far along that backup/restore has come? If you’re running it manually, and you remembered to add the STATS parameter, you can see it in the default output, but what if it’s coming from an enterprise tool, like Commvault?

It would also be great to get the progress on other operations, like shrinks, DBCC CheckDB, etc. While not every operation will report its progress, this little script will report progress on whatever operations do provide it.

SELECT  r.session_id 
         ,DB_NAME(r.database_id) 
         ,r.status 
         ,r.command 
         ,r.wait_type 
         ,r.percent_complete 
         ,CASE WHEN estimated_completion_time < 36000000 THEN '0'
              ELSE ''
         END 
         + RTRIM(r.estimated_completion_time / 1000 / 3600) + ':'
         + RIGHT('0' + RTRIM(( r.estimated_completion_time / 1000 ) % 3600 / 60),2) 
         + ':' + RIGHT('0' + RTRIM(( r.estimated_completion_time / 1000 ) % 60), 2) 
         AS TimeRemaining 
         ,GETDATE() + ( CASE WHEN estimated_completion_time < 36000000 THEN '0'
                            ELSE ''
                       END 
                       + RTRIM(r.estimated_completion_time / 1000 / 3600)
                       + ':' + RIGHT('0' + RTRIM(( r.estimated_completion_time / 1000 ) % 3600 / 60), 2)
                       + ':' + RIGHT('0' + RTRIM(( r.estimated_completion_time / 1000 ) % 60), 2) ) 
         AS EstimatedCompletionTime
FROM    sys.dm_exec_requests r
WHERE   r.percent_complete > 0

Getting started on my mini-lab

As part of my motivation to do more, I’ve started on my new home-lab. As mentioned on a previous post, this is all running off of an inexpensive Dell desktop! You really don’t need much hardware to start with, just enough to run 2-3 vms (or even just one!). It kind of depends on how you want to continually use your lab:

  • If you’d like to use your new computer for tasks other than running VMs (maybe that’s your only desktop?), then windows 10 is perfectly adequate! It’s more convenient to run windows 10 pro, since it has greater hardware support and remote desktop, but home edition is ok too.
  • You could have a dedicated VM server instead. In this case, you’d want to go with the free edition of ESXi (link —  I think it’s called vSphere Hypervisor edition now?). ESXi uses far less resources than windows 10, so that leaves you more room for the actual guests.

For now, I’m only using windows 10 home. For my VMs, I went with VirtualBox (Link). It’s free, very easy to use and performs great. I could’ve gone with Hyper-V, but that’s not available on Window 10 home.

image

I have this obsession with running windows 3.1 as a VM. The nostalgia is strong.

Downloading the required server software is easy!

  • For Linux, I went with Ubuntu Server (link). I’m an OpenSuse guy at heart, but it seems to me that Ubuntu is taking preferential treatment at Microsoft, so I went with that.
  • For Windows Server, I went with the 180 day free trial of Server 2016 (Link). I believe every DBA should have some degree of understanding of how the operating system is setup, how to maintain it, etc.

Looking back at Windows NT4/RedHat 7 days (ubuntu was still called Slackware back then), it’s amazing how easy it’s become to install a server anymore. Both Ubuntu and Windows Server only require you to select a handful of options, so you’re up and running in no time. Setting up an entire infrastructure (AD/DNS/DHCP) takes considerable more work, but for a basic server, it doesn’t get much easier than that (well, it can, thanks to containers, but that’s a different post).

For my next trick, we’ll download and install Windows Server 2019 (since it’s finally available again). Stay tuned!

SQL Server upgrade shenanigans

It’s late at night, I’m watching Yours, Mine and Ours (the 1968 version), and it’s time to upgrade one of our SQL2014 dev instances to SQL2017. We’d already gone through the upgrade advisor, the issues raised (mostly CLR) were not a big deal, so let’s go ahead and get this done. It’s all smooth sailing until I get this error:

Very odd! After a quick googling, I find this page by Pinal Dave –> https://blog.sqlauthority.com/2017/01/27/sql-server-sql-installation-fails-error-code-0x851a001a-wait-database-engine-recovery-handle-failed/

His suggestion is that there’s an issue with the AD service account, and the fix is to switch to network service. This is dev anyway, and I feel a little careless, so why not? Unfortunately, though, it didn’t work! Not only that, when I tried switching service accounts, I got even weirder errors:


I absolutely love the %1 to logoff.

After a restart and another attempt at the upgrade, and getting the same results, I decided to ditch the upgrade summary and take a peek at the sql server log itself. This is the actual service log, saved under MSQL12.MSSQLSERVER\MSSQL\Log. In there, I’m able to verify a few things:

  • The server starts
  • It tries to run the upgrade scripts

So that’s good, right? Then I find the real culprit (database names hidden to protect the innocent):

Based on this message, what the issue appears to be is that the upgrade script is trying to upgrade some system objects (you can tell they’re system objects because the begin with MS%), and when that fails, it fails the entire upgrade. Interesting! I know that this particular object is left over from some weird replication issues that have not been properly cleaned up, so it’s safe to drop them. But how? I can’t even get the service to come up, but I know I have a few options:

  • I can look up the trace flags that skip upgrade scripts (This very handy link lists all the trace flags –> http://www.sqlservercentral.com/articles/trace-flag/152989/ ) The correct flag is 992 902 — this flag will skip upgrade scripts in the master database. Once the server comes up, I can fix the issue, remove the flag, then retry the upgrade
  • I can be lazy and rename the data file and log files in the filesystem, then restart the upgrade. In theory, SQL should fail to attach the database (because I renamed the files!), then apply the upgrade scripts on any of the databases that actually mounted, and then complete the upgrade. I’m feeling adventurous, so I try that, and it worked! I have a working instance again.So now I have to clean after my mess. I switched the service account back to the proper AD account, and I also stop SQL and rename the data files to the correct extensions. Once I start SQL again, the database mounts properly… I think it’s odd that it didn’t fail the upgrade scripts, so I can only assume that the upgrade scripts did not run again. I’m not super worried, at this point, because next up is fixing the issue by dropping the orphaned replication objects. Since I have to apply CU11 afterwards, I figure that at that point the upgrade scripts will be applied. 10 mins later, I was done.

What are the lessons learned? First of all, before you run an upgrade, make sure your databases are clean, with no weird system objects laying around. Second, if you have a failed upgrade, take a look at the SQL server log itself, there’s usually a ton of useful information in there to help you get up and running again.

Not a minute to waste!

Ok, so I’ve been really excited about this “deployment automation” stuff! That’s not really new, though. I’ve been trying to implement some form of database source control for a few years now, with minimal success. The reasons are various:

  • The tools aren’t all that great. That’s not really their fault, though.
  • There’s not really a true way of doing it, as far as databases are concerned (which is why the tools aren’t that great). Like everything else in database land, the approach sorta… “depends” on a number of different things.

But this isn’t a post about source control or automation! Not yet, anyway. This is a post about how I’m getting ready for it.

We live in an amazing era; tools and processes that were really difficult 5 years ago are easily available now, and work really well. Take Azure and devops, for example! It is really easy to get setup with a free account, download a bunch of tools, and get going. That should be its own post…

I’ve already got my azure instance up and running, so next for me is setup a local environment and a bunch of vms. I picked up a relatively inexpensive machine just two nights ago, a dell inspiron 3670. With a 8th-gen core i5-8400, a 1TB drive and 12GB of RAM, it should provide enough umph to run a couple of VMs and setup some basic integration between local and the cloud. In the next few posts, I’m going to detail how I got things setup.

New (old) directions

I just returned from my early peregrination to Seattle, to attend SQL PASS. This was really an amazing year, and I learned a great many things! I’ve decided that, after 11 years as a full-time DBA, it was time to take up the proverbial pencil and share some of the things I’ve learned, and some of the projects I’m working on.

Things have changed quite a bit since SQL2000 days, and there’s a lot of exciting things going on. I figured that writing them down will help me keep track of how I’ve accomplished them, as well as share the knowledge with others. So I’ve repurposed the old site, dusted the cobwebs, made a few tweaks, and now I’m ready to go! I haven’t actively written about work since I left PCMagazine all the way back in the 90’s, when I worked for the Brazilian edition of PCMag, so I’m a little nervous, and more than a little rusty, but hey, what could possibly go wrong?